Bean就是Java里面的对象的实例,所以,class文件仅仅是对象的定义。
所以才需要按照定义创建(new)一个实例。
属性
| class | 定义bean的类,必须要有 |
| id | bean的名字 |
| scope | bean作用域 |
| constructor-arg | 构造器依赖注入用到的参数 |
| property | 依赖注入的参数 |
| autowire | 自动装配模式 |
| lazy-initialization | bean第一次被请求时再初始化 |
| init-method | bean初始化后执行的方法 |
| destroy-method | bean销毁后执行的方法 |
| abstract | 作为模版使用,和class冲突 |
| parent | 指定父bean |
作用域
Bean对象在容器内生效的范围,是整个容器还是单个实例。
| singleton | 在一个容器内只有一个实例(默认) |
| prototype | 每次请求这个Bean都新创建一个 |
| request | Bean存在于HTTP请求 |
| session | Bean存在于HTTP会话 |
| global-session | Bean存在于全局HTTP会话 |
例子:(先按照这里创建一个项目,或者下载我做好的)
在src/main/resources文件夹下创建Beans.xml文件:
<?xml version="1.0" encoding="UTF-8"?>
<beans xmlns = "http://www.springframework.org/schema/beans"
   xmlns:xsi = "http://www.w3.org/2001/XMLSchema-instance"
   xsi:schemaLocation = "http://www.springframework.org/schema/beans
   http://www.springframework.org/schema/beans/spring-beans-3.0.xsd">

	<bean id='helloWorld' class='com.explause.SpringExamples.HelloWorld' scope='prototype'/>
</beans>然后创建HelloWorld.java文件:
package com.explause.SpringExamples;

public class HelloWorld {
	private String message;

	public void setMessage(String message){
		this.message  = message;
	}
	public void getMessage(){
		System.out.println("Your Message : " + message);
	}
}最后的main函数入口BeanConfigDemo.java文件:
package com.explause.SpringExamples;
import org.springframework.context.support.ClassPathXmlApplicationContext;
public class BeanConfigDemo {
public static void main(String[] args) {
ClassPathXmlApplicationContext context = new ClassPathXmlApplicationContext("Beans.xml");
HelloWorld obj1 = (HelloWorld) context.getBean("helloWorld");
obj1.setMessage("Hello World");
obj1.getMessage();
HelloWorld obj2 = (HelloWorld) context.getBean("helloWorld");
obj2.getMessage();
context.close();
}
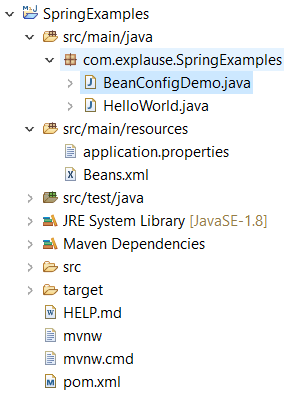
}最终的项目结构:
执行main函数(方法)后的结果:
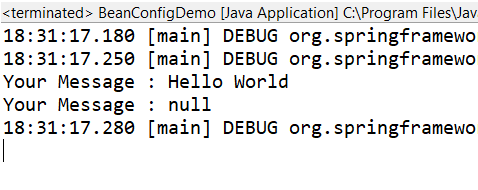
因为在singleton作用域下,一个容器内这个类型的对象只有一个实例,怎么返回都是返回同一个对象。
如果将作用域改成singleton,那么输出的两条消息都是一样的,即Hello World。
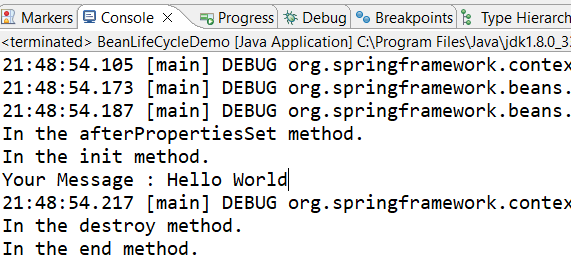
生命周期管理
Bean实例化之后可能需要做一些初始化工作,Bean从容器里移除之后也需要一些清理工作,
有两种方法,一种是在xml文件里配置,一种是实现两个接口。
xml文件里面定义的话就要在Bean的源码文件里写好函数(方法),然后在xml文件里配置
bean标签的init-method或destroy-method属性。
实现接口有InitializingBean和DisposableBean两个。
例子:
BeansLifeCycle.xml文件:
<?xml version="1.0" encoding="UTF-8"?>
<beans xmlns = "http://www.springframework.org/schema/beans"
   xmlns:xsi = "http://www.w3.org/2001/XMLSchema-instance"
   xsi:schemaLocation = "http://www.springframework.org/schema/beans
   http://www.springframework.org/schema/beans/spring-beans-3.0.xsd">

	<bean id='helloWorld' class='com.explause.SpringExamples.HelloWorldLifeCycle' scope='singleton' init-method='init' destroy-method='end'>
		<property name="message" value='Hello World'/>
	</bean>
</beans>
HelloWorldLifeCycle.java文件:
package com.explause.SpringExamples;

import org.springframework.beans.factory.DisposableBean;
import org.springframework.beans.factory.InitializingBean;

public class HelloWorldLifeCycle implements InitializingBean, DisposableBean {
	private String message;

	public void setMessage(String message){
		this.message  = message;
	}

	public void getMessage(){
		System.out.println("Your Message : " + message);
	}

	public void init() {
		System.out.println("In the init method.");
	}

	public void end() {
		System.out.println("In the end method.");
	}

	@Override
	public void destroy() throws Exception {
		System.out.println("In the destroy method.");
	}

	@Override
	public void afterPropertiesSet() throws Exception {
		System.out.println("In the afterPropertiesSet method.");
	}

}
BeanLifeCycleDemo.java文件:
package com.explause.SpringExamples;

import org.springframework.context.support.ClassPathXmlApplicationContext;

public class BeanLifeCycleDemo {
	public static void main(String[] args) {
		ClassPathXmlApplicationContext context = new ClassPathXmlApplicationContext("BeansLifeCycle.xml");
		HelloWorldLifeCycle obj1 = (HelloWorldLifeCycle) context.getBean("helloWorld");
		obj1.getMessage();
		context.close();
	}
}
后期处理
通过BeanPostProcessor接口,可以放一些自定义逻辑,依赖解析等行为。也可以搭配Ordered接口配置多个实现。作为Bean配置在xml文件里面。
例子:在上面生命周期管理的例子里添加一个HelloWorldPostProcessor.java文件:
package com.explause.SpringExamples;

import org.springframework.beans.BeansException;
import org.springframework.beans.factory.config.BeanPostProcessor;

public class HelloWorldPostProcessor implements BeanPostProcessor {
	@Override
	public Object postProcessBeforeInitialization(Object bean, String beanName) throws BeansException {
		System.out.println("BeforeInitialization : " + beanName);
		return bean;
	}

	@Override
	public Object postProcessAfterInitialization(Object bean, String beanName) throws BeansException {
		System.out.println("AfterInitialization : " + beanName);
		return bean;
	}
}
BeansLifeCycle.xml文件:
添加了注册HelloWorldPostProcessor的代码:
<?xml version="1.0" encoding="UTF-8"?>
<beans xmlns = "http://www.springframework.org/schema/beans"
   xmlns:xsi = "http://www.w3.org/2001/XMLSchema-instance"
   xsi:schemaLocation = "http://www.springframework.org/schema/beans
   http://www.springframework.org/schema/beans/spring-beans-3.0.xsd">

	<bean id='helloWorld' class='com.explause.SpringExamples.HelloWorldLifeCycle' scope='singleton' init-method='init' destroy-method='end'>
		<property name="message" value='Hello World'/>
	</bean>
	<bean class="com.explause.SpringExamples.HelloWorldPostProcessor"/>
</beans>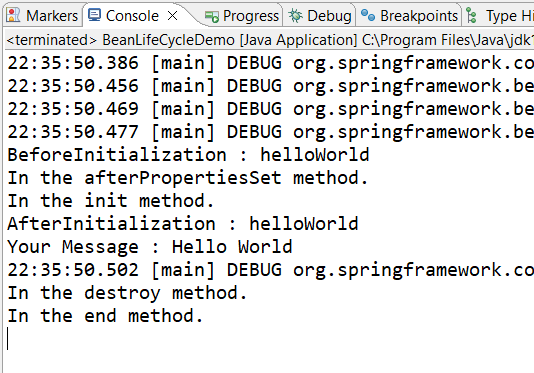
Bean定义继承
子类设置parent属性,父类的同名属性会被子类覆盖,如果有的话。 还可以设置模版bean,没有class属性。
例子:
BeansParent.xml文件:
<?xml version="1.0" encoding="UTF-8"?>
<beans xmlns = "http://www.springframework.org/schema/beans"
   xmlns:xsi = "http://www.w3.org/2001/XMLSchema-instance"
   xsi:schemaLocation = "http://www.springframework.org/schema/beans
   http://www.springframework.org/schema/beans/spring-beans-3.0.xsd">

	<bean id='helloWorld' class='com.explause.SpringExamples.HelloWorld'>
		<property name="message" value='Hello World'/>
	</bean>
	<bean id='helloWorld2' class='com.explause.SpringExamples.HelloWorld2' parent='helloWorld'>
		<property name="message2" value='Hello World 2'/>
	</bean>
</beans>
HelloWorld.java文件:
package com.explause.SpringExamples;

public class HelloWorld {
	private String message;

	public void setMessage(String message){
		this.message  = message;
	}
	public void getMessage(){
		System.out.println("Your Message : " + message);
	}
}
HelloWorld2.java文件:
package com.explause.SpringExamples;
public class HelloWorld2 {
private String message;
private String message2;
public void setMessage(String message){
this.message = message;
}
public void getMessage(){
System.out.println("Your Message : " + message);
System.out.println("Your Message 2 : " + message2);
}
public void setMessage2(String message2){
this.message2 = message2;
}
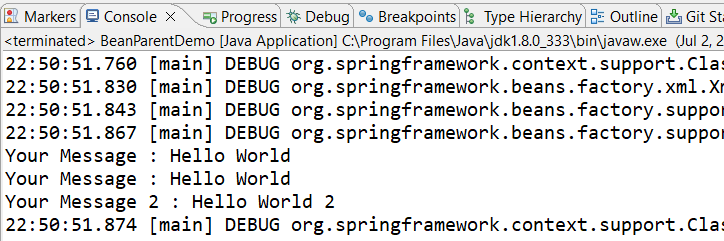
}BeanParentDemo.java文件:
package com.explause.SpringExamples;

import org.springframework.context.support.ClassPathXmlApplicationContext;

public class BeanParentDemo {
	public static void main(String[] args) {
		ClassPathXmlApplicationContext context = new ClassPathXmlApplicationContext("BeansParent.xml");
		HelloWorld obj1 = (HelloWorld) context.getBean("helloWorld");
		obj1.getMessage();

		HelloWorld2 obj2 = (HelloWorld2) context.getBean("helloWorld2");
		obj2.getMessage();
		context.close();
	}
}